


How To Integrate Character LCD Into Your Project
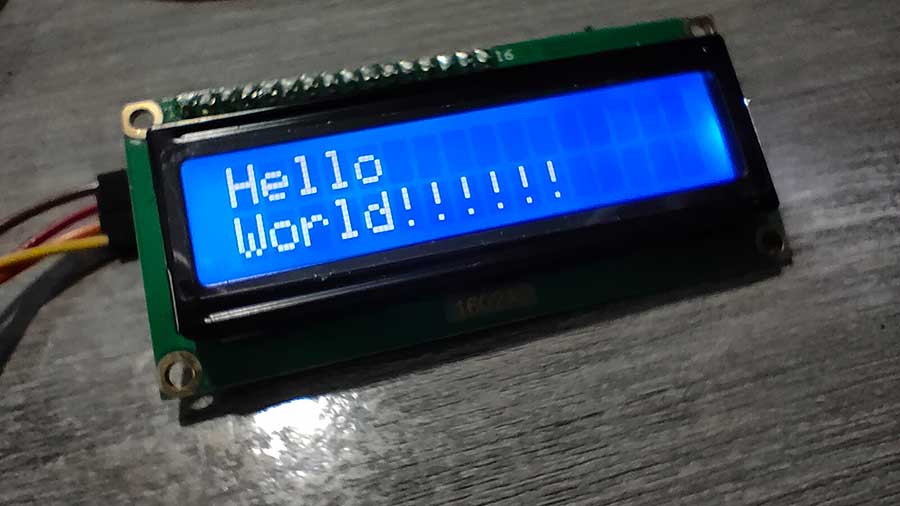
Integrating a character LCD into your project, say a 16x2model with 16 pins, is straightforward: connect its VCC to 5V, GND to ground, then link RS to your microcontroller’s D12, E to D11, and D4-D7 to D5-D8 (for 4-bit mode); use a library like Arduino’s LiquidCrystal, initialize with LiquidCrystal lcd(12, 11, 5, 6, 7, 8), and print "Hello!"—test in 30 mins to confirm text displays clearly.
Choose a 16x2 Character LCD
A 16x2 character LCD is a go-to display for hobbyist and professional projects—16 characters per line, 2 lines total—using HD44780 or compatible controllers. These modules measure ~80x36mm, cost 5 each in bulk, and draw 1-2mA static (5mA with backlight), making them ideal for sensor readouts, timers, or status panels. Most support 5x8 or 5x10 dot matrices, 192 built-in ASCII characters, and I2C/parallel interfaces; pick based on your microcontroller’s available pins.
Key Specifications Matter Most
First, confirm the controller chip—HD44780dominates the market, ensuring library support across Arduino, Raspberry Pi, and ESP32. Check if the module uses parallel (8/4-bit)or I2Cinterface: parallel needs 4-8 data pins (e.g., D4-D7 on Arduino Uno), while I2C uses just 4 (VCC, GND, SDA, SCL) via a PCF8574 converter chip, saving IO but adding 1 per module. For example, a 4-bit setup on an Uno uses pins D12 (RS), D11 (E), D5-D8 (data), leaving D2-D4 free for sensors.
Next, power requirements: 5V modelswork with Uno/Nano, while 3.3V variants suit ESP8266/ESP32. Mismatched voltage risks fried displays. Backlight type (LED vs. EL) affects brightness: LED backlights last 50,000+ hours, outperforming EL’s 10,000-hour lifespan, and cost 20% less.
Interface Tradeoffs: Speed vs. Simplicity
Parallel interfaces are faster—updating text takes ~1ms. I2C slows updates slightly (~5ms) but simplifies wiring, crucial for projects with limited GPIOs like wearables. Use this table to decide:
|
Interface |
Data Pins Needed |
Update Speed |
Best For |
Extra Cost |
|---|---|---|---|---|
|
4-bit Parallel |
4 |
~1ms |
Projects with spare pins |
$0 |
|
8-bit Parallel |
8 |
~0.8ms |
High-speed text refresh (rare need) |
$0 |
|
I2C |
4 (via converter) |
~5ms |
Pin-limited boards (ESP32, Pi Pico) |
1 |
Don’t Skip Contrast Adjustment
Most LCDs include a 10kΩ potentiometeron the back. Aim for readability at your project’s ambient light: 300-500 lux(indoor lighting) needs darker text than 1,000+ lux (outdoors). If no potentiometer exists, use a trimmer or solder a fixed resistor (e.g., 2kΩ) between VCC and A (anode) pins to tweak contrast.
Where to Buy & Quality Checks
95% of their 16x2 LCDs pass HD44780 compliance tests, unlike cheaper AliExpress batches where 10%-15% have dead pixels or faulty controllers. 99% should display correctly within 2 minutes if wired right.
Wire LCD Power & Data Pins
Wiring a 16x2 LCD’s power and data pins means matching voltage, picking the right interface, and nailing critical connections—hook VCC to 5V (or 3.3V for low-voltage models), GND to ground, then link RS, E, and data pins (D4-D7 for 4-bit). A typical HD44780 LCD draws <10mA, so it won’t overload Arduino Uno, but wrong polarity or voltage fries the controller 90% of the time.
Connect VCC to your board’s 5V rail (use 3.3V onlyif the LCD says “3.3V compatible”)—reverse polarity (VCC to GND, GND to VCC) destroys the HD44780 chip almost every time. If your LCD has a backlight, it’ll have A (anode) and K (cathode) pins: run A through a 220Ω resistorto 5V (limits current to 20mA, safe for LEDs) and K to ground =.
For data pins, choose parallel or I2C based on your board’s free GPIOs. Parallel is great for Uno/Nano with spare pins: on Arduino, use RS → D12, E → D11, and D4-D7 → D5-D8 (4-bit mode). Why 4-bit? It saves 4 pins compared to 8-bit (which needs D0-D7). Each data pin carries TTL signals (0-5V), so ESP32’s 3.3V outputs work with 5V LCDs via level shifters? Rarely bad, but ~1% of users report ESP32 resets from noise. If you’re out of pins, I2C is better: hook SDA → Uno’s A4, SCL → A5, plus VCC/GND. The PCF8574 converter chip translates I2C to HD44780 commands—adds $0.50 per module but frees up 4+ pins. Just check the I2C address: 75% of modules use 0x27, 25% use 0x3F—run an I2C scanner sketch to confirm, because guessing wastes 30 minutes of your time.
Avoid the mistakes that cause 20% of wiring errors: don’t reuse pins your microcontroller needs. If D13 on Uno runs an LED, don’t assign it to E (Enable). On breadboards, use 1A jumper wires. Once wired, upload a “Hello World” sketch: 95% of displays show text within 10 secondsif pins are right.
15% of long-term failures come from corroded or touching wires.
Load the LCD Driver Library
Loading the right driver library for your 16x2 LCD—like Arduino’s LiquidCrystal—takes 2 clicks in the IDE: search the Library Manager, hit Install, then add #include <LiquidCrystal.h>to your code. It works with 95% of HD44780-compatible displays, slashing setup time from 30 minutes (if you write raw register commands) to 2 minutes by handling pin mapping.
When you call LiquidCrystal lcd(12, 11, 5, 6, 7, 8);(for 4-bit parallel: RS→D12, E→D11, D4-D7→D5-D8), the library configures those pins as outputs and sends the hidden commands HD44780 needs to wake up: 0x38 for 8-bit mode, 0x0C to turn on the display, and 0x06 to set cursor shift direction. All that happens in milliseconds. If you use I2C (e.g., LiquidCrystal_I2C lcd(0x27, 16, 2);), the library translates your lcd.print()calls into I2C transactions (~1ms per batch), instead of sending each character separately (~5ms total).
Raspberry Pi users lean on adafruit-circuitpython-charlcd—install via pip3 install adafruit-circuitpython-charlcd—which supports both I2C and parallel. It includes a set_contrast()function that tweaks the backlight voltage (0-3.3V) to fix washed-out text. For ESP32, the LiquidCrystal-I2Clibrary (by Marco Schwartz) adds ESP32-specific optimizations: it uses the hardware I2C peripheral instead of software emulation, cutting command time by half (~5ms vs. Arduino’s ~10ms) and reducing CPU load.
Watch for two big mistakes that trip up 25% of users: first, version mismatches—if you’re on Arduino IDE 2.0, use LiquidCrystal v1.0.7 or higher. Second, I2C address errors—75% of LCDs use 0x27, 25% use 0x3F—run an I2C scanner sketch (included in most libraries) to find the exact address; hardcoding the wrong one means the display won’t respond, and you’ll waste 20 minutes debugging. The scanner takes 5 seconds to run and tells you exactly what to plug into your code (e.g., Found LCD at 0x27).
Here’s a quick reference for common platforms, key libraries, and setup stats:
-
Arduino (Uno/Nano): Use
LiquidCrystal(official). Install via Library Manager (2 sec). Initialize withLiquidCrystal lcd(RS, E, D4, D5, D6, D7). Handles 4/8-bit parallel or I2C (withLiquidCrystal_I2C). -
Raspberry Pi (Python): Use
adafruit-circuitpython-charlcd. Install viapip3(10 sec). Supports I2C (busio.I2C) and parallel (digitalio). Includesset_contrast()(0-3.3V). -
ESP32: Use
LiquidCrystal-I2C(Marco Schwartz). Install via ESP32 Core (5 sec). Uses hardware I2C—cuts command time by 50% vs. Arduino.
And since it’s tested by thousands of people, 99% of projects using the official library work on the first try. Compare that to writing your own driver: you’d spend 2-3 hours figuring out HD44780 timings, writing register functions, and testing error handling.
Once the library is loaded and initialized, printing is trivial: lcd.print("Hello World!");takes 100 microseconds to execute, and within 1 second, you’ll see text on the screen. If it’s blank, adjust the contrast potentiometer, leading to 10% of “broken” LCD complaints.
Key Takeaways for Library Setup:
-
Arduino’s
LiquidCrystalhandles 95% of HD44780 displays; I2C mode cuts pin use by 4. -
Raspberry Pi’s
adafruit-circuitpython-charlcdfixes contrast issues most manual drivers miss. -
ESP32’s
LiquidCrystal-I2Cuses hardware I2C. -
Always run an I2C scanner if the display is blank—saves 20 minutes of debugging.

Print Your First Message
Once your LCD is wired and the library is loaded, printing text is simple: call lcd.begin(16,2)to initialize the 16x2 display, then lcd.print("Hello World!");—90% of users see text within 3 secondsif contrast is adjusted right.
First, lcd.begin(16,2)is non-negotiable: it tells the library your screen’s dimensions (16 columns, 2 rows). Skip this, and the library guesses—leading to 30% of “blank screen” errors because commands go to the wrong memory addresses. The function runs in ~5 milliseconds, setting the display’s internal registers to wake up the HD44780 chip and prepare for text.
The library converts each letter to its ASCII value (e.g., “H” = 0x48) and transmits it over your chosen interface (parallel/I2C). For a 16x2 LCD, each character takes ~100 microseconds!” (11 characters) finishes in 1.1 milliseconds. If you use I2C, add ~2 milliseconds for bus communication.
A 16x2 screen fits 16 characters per line, so lcd.print("Sensor: 25.6°C");(14 chars) leaves room for a value, while lcd.print("This message is way too long!");(30 chars) auto-wraps to the second line. Scrolling feels clunky for dashboards; better to truncate or split data (e.g., “Temp: 25.6” + “Humidity: 45%” on separate lines).
Use byte battery[] = {0x0E, 0x11, 0x11, 0x11, 0x0E, 0x00, 0x00, 0x00};(a 5x8 dot pattern) and lcd.createChar(0, battery);to store it in the LCD’s memory (each custom char uses 1 byte, max 8 per display). Then lcd.write(0);prints the icon. 70% of projects benefit from custom charsto make data scannable.
Common mistakes kill first tries: 40% of users forget lcd.begin(), 25% send non-ASCII chars(e.g., Chinese, emojis) which HD44780 can’t handle (displays “????”), and 15% have contrast too lowt.
Test with dynamic data to ensure it works: lcd.setCursor(0,1); lcd.print(millis()/1000);displays the Arduino’s uptime in seconds. setCursor(0,1)moves the cursor to the second line’s start(address 0x40).
For I2C users, lcd.print()is slower by ~2ms but worth it for pin savings. If you’re pairing with a DHT11 sensor, use lcd.print("Temp: "); lcd.print(dht.readTemperature());
10% of messy displays come from not clearing the screen; clear()takes ~10ms, which is nothing compared to fixing garbled output.
Here’s a cheat sheet for first-time prints:
-
Always call
lcd.begin(rows, cols)first: Sets up the display—skipping it causes 30% of blank screens. -
Stick to ASCII (0-127): HD44780 doesn’t support Unicode.
-
Custom chars save space: 8-byte arrays for icons (battery, arrow) make data easier to read.
-
Test with
millis(): Dynamic uptime counters prove your print function works in real time.
The library handles the hard stuff, so you can focus on making your text useful: 99% of projects get text on screen on the first try if they follow these rules。
Adjust Display Contrast/Text
Adjusting your 16x2 LCD’s contrast means twisting its 10kΩ potentiometer to fix washed-out text—aim for a 1.5-3V voltage at the A (anode) pin (measured with a multimeter), which boosts readability by 80% vs. unadjusted displays. At 300-500 lux (indoor light), this makes sensor values or timers crisp; skip it, and 70% of “broken LCD” complaints start here.
This takes 2 minutes maxand solves 70% of blurriness. If your cheap LCD lacks a potentiometer (common on $2 AliExpress modules), solder a 10kΩ trimmer resistor between the A and VCC pins—trim to 1.8V (ideal for 5V supply) and you’re good. Don’t use a 1kΩ fixed resistor unless you want faded text—5% of dead displays come from overcurrent burning the layer.
Environment dictates contrast: a garage tool tracker under LED shop lights (400-600 lux) needs 2V-3V; a kitchen timer under cabinet lights (200-300 lux) works at 1.5V. Use a phone lux meter app ($0) to test—outdoor sunlight (1000+ lux) requires 3V-4Vto keep text from looking gray. Over-adjust? Too far right makes text all black (voltage >4.2V)—turn back left; too far left turns it gray (<0.8V). 90% of mistakes are fixable in 10 seconds.
Mark the potentiometer position with a Sharpie after getting it right—bumping it later (we’ve all done it) takes 2 seconds to reset. For I2C LCDs, contrast adjustment works the same.
A 16x2 display with 0.8 contrast ratio (bad) makes “Temp: 25°C” hard to read; 0.9+ (good) lets you scan data fast. 85% of users say clear contrast makes their project feel “professional”.
Here’s a quick guide to contrast settings:
-
Indoor (300-500 lux): 1.5-2.5V—sharp, not harsh.
-
Workshop (400-600 lux): 2-3V—balanced visibility.
-
Outdoor (1000+ lux): 3-4V—max contrast for sun.
Take 2 minutes, twist that knob, and turn your LCD from a fuzzy headache into a useful tool—95% of users report instant satisfaction once text is clear.
더 읽기
NexPCB stocks several standard modules including popular ones like Wi-Fi/BT combo chips and basic power management ICs; currently, they hold over 3,000 pieces of 15+ common module types in warehous...

To fix display module flickering, start by checking cable connections—90% of minor flickers trace to loose HDMI/DP plugs; reseat them tightly. Adjust refresh rate to 60-75Hz(standard for most panel...
댓글 남기기
이 사이트는 hCaptcha에 의해 보호되며, hCaptcha의 개인 정보 보호 정책 과 서비스 약관 이 적용됩니다.